OpenAI’s ChatGPT & GPT-4

Reading Time: 3 minutes

OpenAI has recently announced its latest AI model, GPT-4, which is set to power the next iteration of ChatGPT. ChatGPT is a sophisticated chatbot capable of engaging in natural language discussions with people on a wide range of topics. The current version is based on GPT-3.5, a cutting-edge deep learning technology that uses artificial neural networks to generate human-like text. Although similar things have been done before, what stands out about this is its ability to engage in conversation and respond to unique questions that traditional text-based AI typically cannot handle.

What is GPT?

GPT, which stands for Generative Pre-trained Transformer, is a machine learning model that is trained on a vast amount of text data. Its primary purpose is to generate human-like text responses based on the given input. The number on the end represents the generation or version and with every successive iteration, improvements in the model’s architecture, training data, and overall performance become evident when compared to its predecessor.

GPT-4

GPT-4 is the fourth iteration of the text-based AI model trained by OpenAI who have been releasing iterations since 2018. They claim it can respond better by seeing reason and is the first model to accept images as input that they have released. Previously it would only accept text prompts. It can now also generate longer responses as it’s able to generate up to 25, 000 words of text. OpenAI has revealed that GPT-4 was trained on Microsoft Azure AI supercomputers and has been deployed on Microsoft Azure’s AI-optimized infrastructure to ensure efficient access for users worldwide. Unlike GPT-3, GPT-4 is not available for free and requires a subscription to GPT Plus, which costs approximately $30 AUD per month. I have decided to give this new model a go and once subscribed a new option is available in Chat-GPT to try the newly released model. They also give you the option to switch to various versions of GPT3.

Chat GPT Model Selection


Limitations & Issues

Similar to its predecessors, GPT-4 has its limitations, including a tendency to generate hallucinated answers or introduce biases in response to certain questions. While using GPT-4 to write Verilog, a Hardware Description Language (HDL), I’ve noticed that it occasionally fabricates syntax that, although seemingly plausible, does not actually exist. It also only has knowledge of world events only going up to September of 2021 so asking it questions about significant milestones after that time could yield a fabricated answer or no answer at all.

Evolution of AI

OpenAI’s release of GPT-4 marks a significant milestone in the evolution of AI language models. While it retains some limitations, such as making up answers and occasionally making simple reasoning errors, GPT-4 demonstrates notable improvements over its predecessor, GPT-3.5. These advancements include a reduced likelihood of generating harmful or disallowed content along with a heightened compliance to OpenAI’s policies for sensitive requests. In the past, I have been fascinated by ‘jailbreaks‘ related to these policies and answers where it says it can’t do something while doing that very exact thing, which I might delve into in future posts.

In conclusion there is still much to discuss in this rapidly evolving domain, and I will continue to share content on utilizing the API, as well as delving into intriguing use cases that I’ve come across.

How To Build An AI Object Detection System with Azure Custom Vision

Reading Time: 11 minutes

Introduction

Machine Learning (ML) and Artificial Intelligence (AI) are not new concepts, you may have heard these buzz words thrown around and mentioned on various products or services. These concepts can help solve real world problems in a unique and optimal way. Object detection is one challenge that can be tackled with Machine Learning that can evolve and become more accurate over time. Azure Cognitive Services provides developers the capability to tap into this technology to easily develop solutions for challenges in our daily lives. Azure also offers an image recognition service called Custom Vision. This blog post will explain the fundamentals of ML and walk you through how easy it can be to create your own object detection system using Custom Vision. Utilizing this tool can unlock a treasure trove of use cases applicable to you or your business.

What is Machine Learning?

Machine learning, put simply is a branch of Artificial Intelligence (AI) that focuses on mimicking human behaviour by observing data and using algorithms to learn and improve itself gradually over time. This is the process of learning that we all naturally do. We observe experiences looking for patterns to help direct us into making better decisions. The ultimate goal for a computer is to be able to learn, improve and adjust its actions according to its experiences without any human intervention or assistance.

Building an Object Detection System with Custom Vision

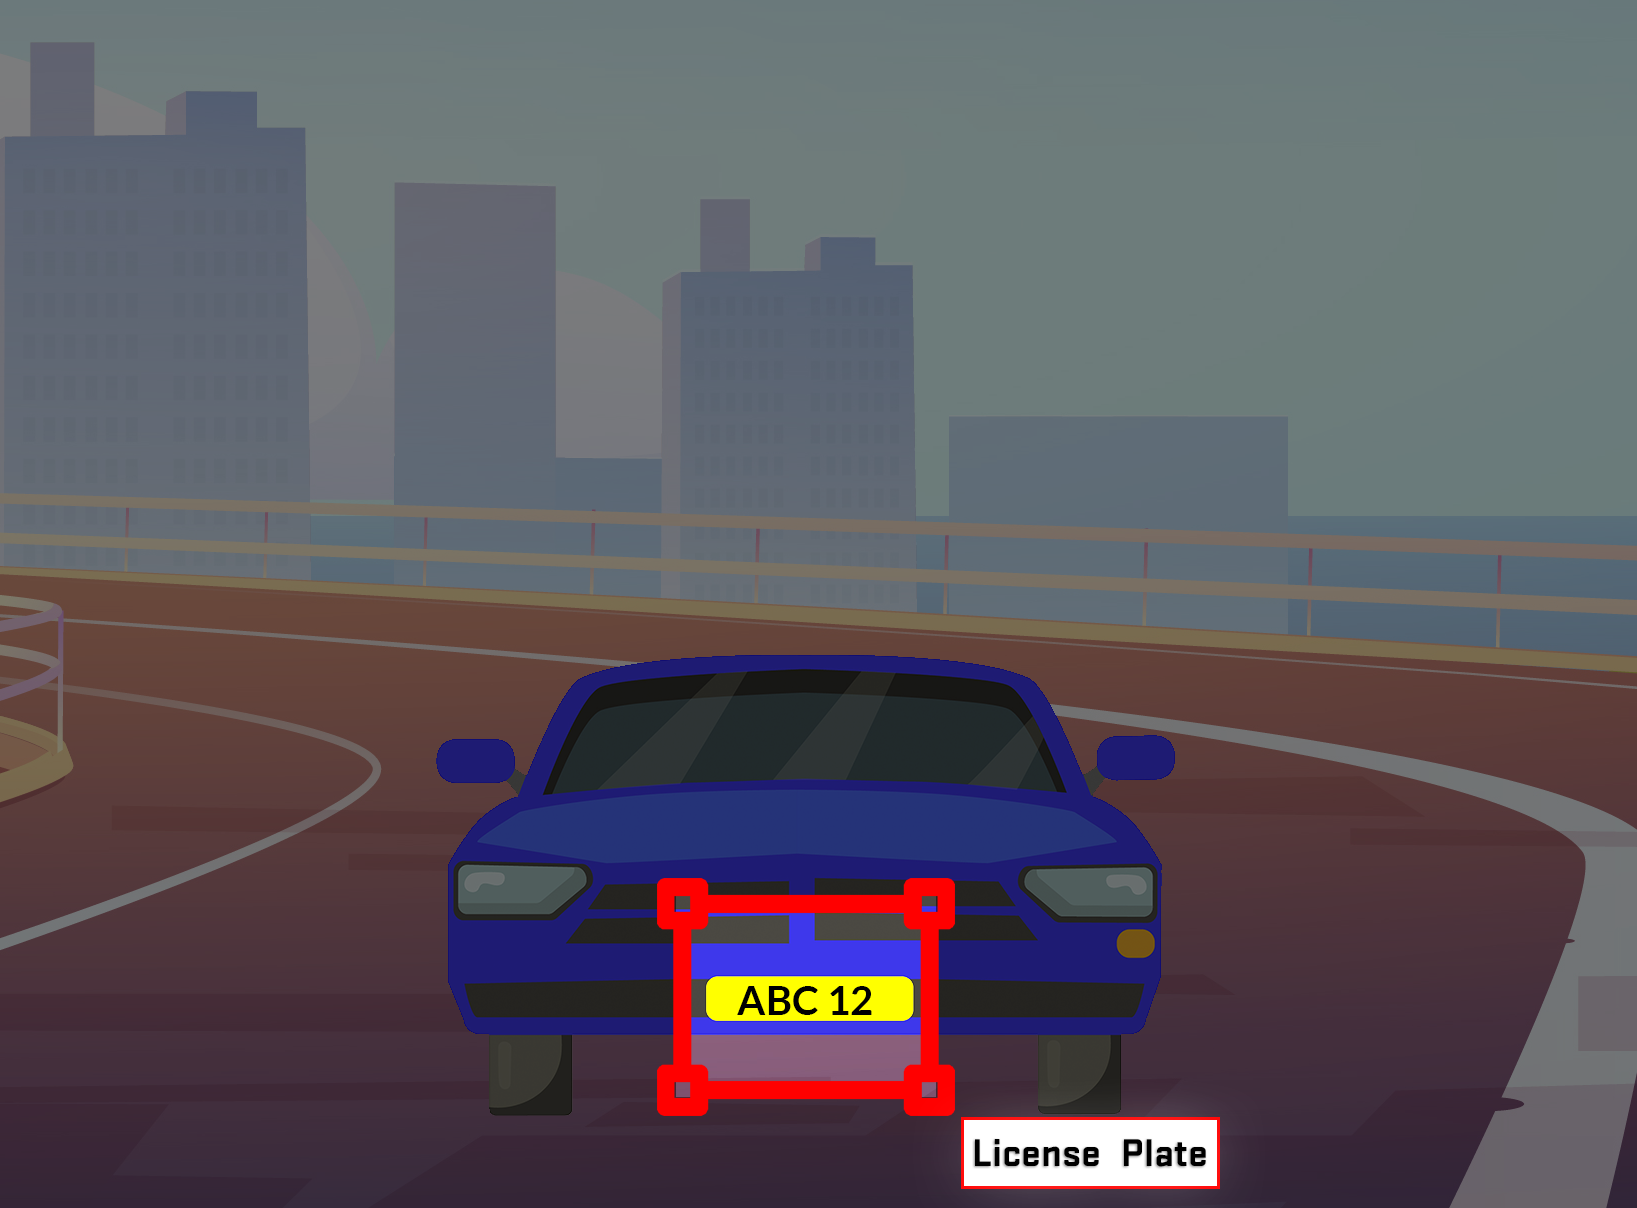
In this demonstration we will build an object detection system to recognise vehicle number plates in images. You may have come across a system that does this already such as the entrance and exit boom gates at a shopping centre or a police patrol vehicle parked on the highway. They both utilise a technology known as Automatic Number Plate Recognition (ANPR) which uses ML algorithms to accomplish this.

To tackle any challenge such as object detection with ML there is a process that must be followed which can be split into two parts. We’ll explain the process then guide you through how to perform this in Custom Vision.

Part One – Training a predictive model

The first part of the process involves training a machine on some input data. In our case this input data will be images. We will specify where in each image there is a license plate, this is referred to as ‘tagging’ or ‘labelling’. It is beneficial to include a variety of different lighting conditions, environments, and angles. We’ll later go into detail on how to improve this model to be more accurate.

The tagged images will then be run through the ML training process and the output will make up the ‘model’ which we will use in the next step to run predications on new unseen data.

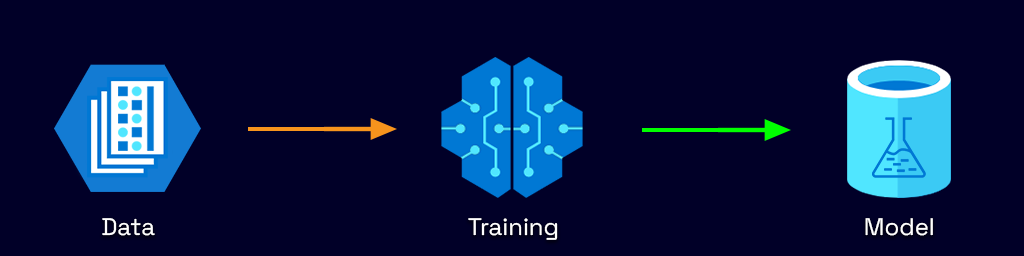
Part Two – Running Predictions

The second part of the process involves using the model created from the first to run predictions on new unseen data. In our case it will be new images of cars with license plates visible in them. We will not tag these images but observe to see if there are accurate predictions after they have been run through the service.

Step-By-Step On Getting Started With Custom Vision

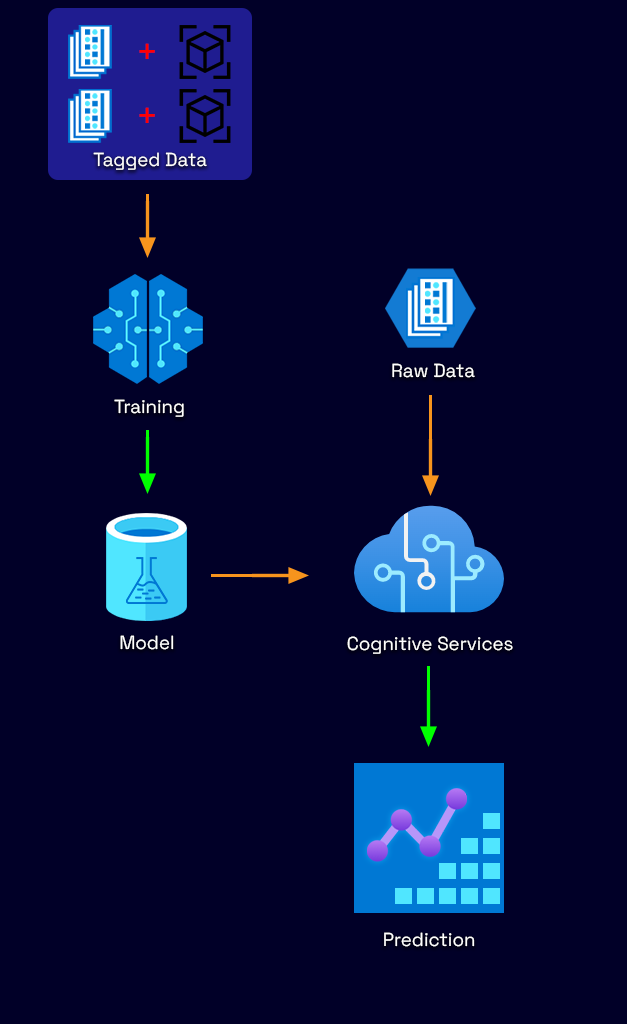
Custom Vision is an image recognition service provided by Azure to build and deploy your own image identification model. It lets you perform the process described above by uploading your own images and tagging them with labels depending on the outcome you wish to see. Custom Vision will then train on this data using machine learning algorithms to calculate its own accuracy by testing itself on the same set of images. You can then test and retrain the model as much as you wish to ultimately use it within your own application.

The service facilitates two features.

  • Image classification
    • Applies labels and classifies images based upon those labels. An example would be if you were distinguishing different types of fruit.
  • Object detection
    • Detects objects within an image and the output results contain coordinates of their location.

Object detection is what we will utilize it for and see how the accuracy of our model can be improved by iterations.

Setting up a new Project

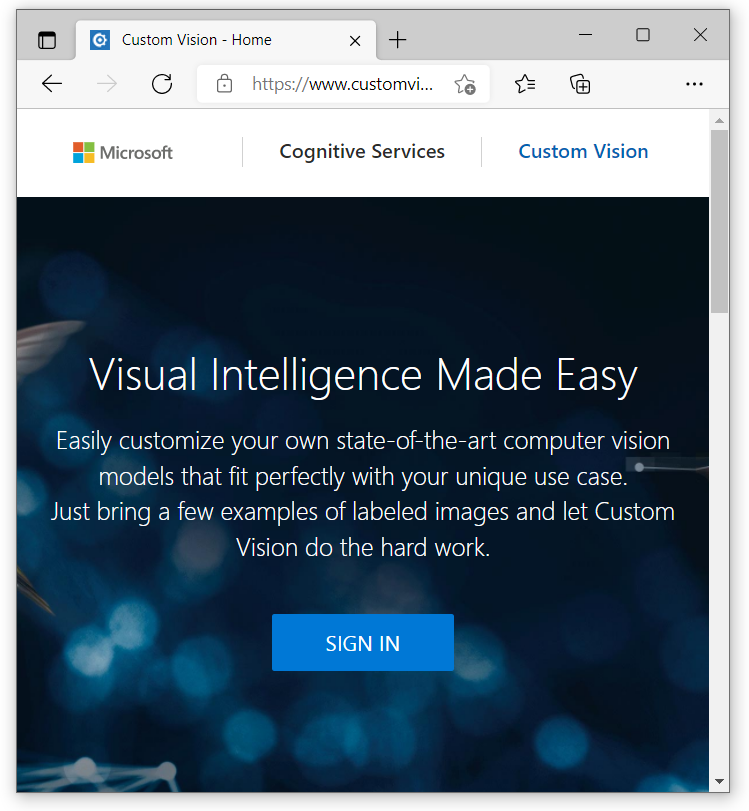
To use Custom Vision you must have a Microsoft account linked to an Azure subscription. Head over to the website at https://customvision.ai/ and click on Sign-In.

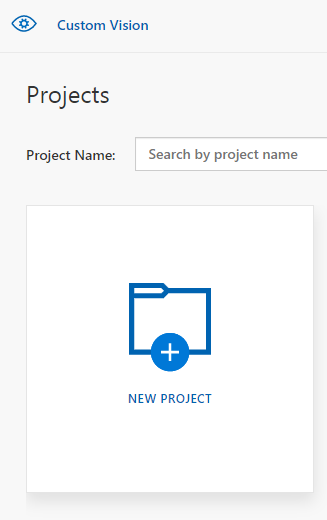
Once you are signed in you can go ahead and create a new project.

This action should bring up a dialog modal which requests some basic information about the project.

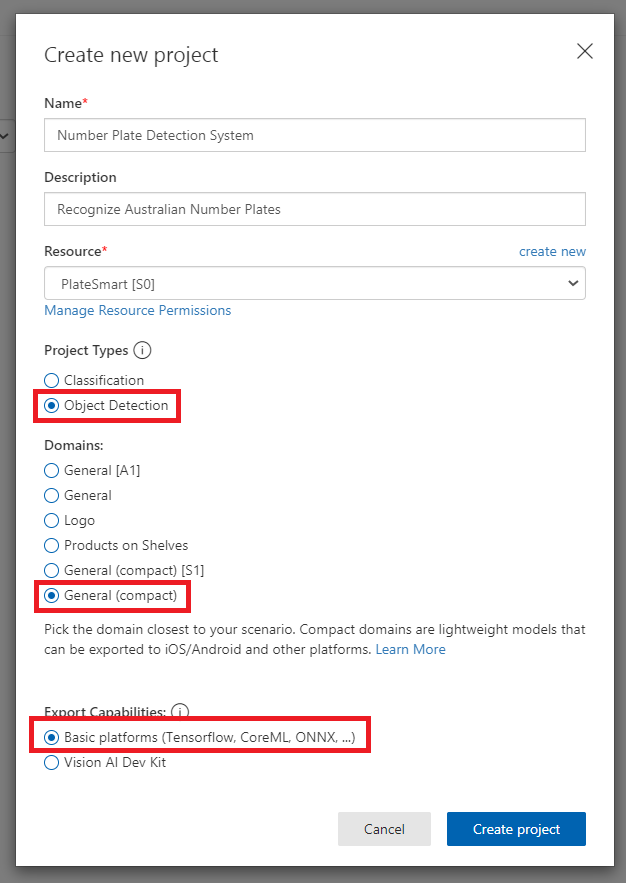
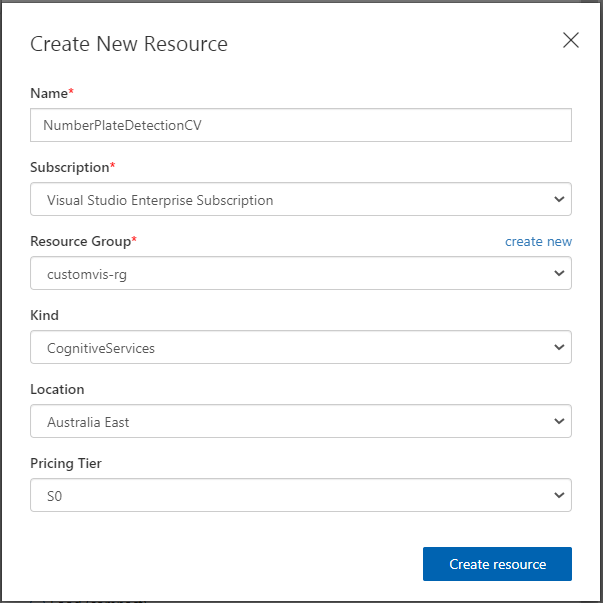
You can then go ahead and fill in the Name and Description to what you would like. For the Resource field you may need to press ‘create new’ and fill in additional information to create a resource for this project. Make sure the Project type is set to ‘Object Detection’ since we are detecting objects for this demonstration. The Domains option you can leave as General however, I strongly recommend setting this to General (compact) as this gives you the ability to export your model at a later stage. It can then be used offline.

Training for Object Detection

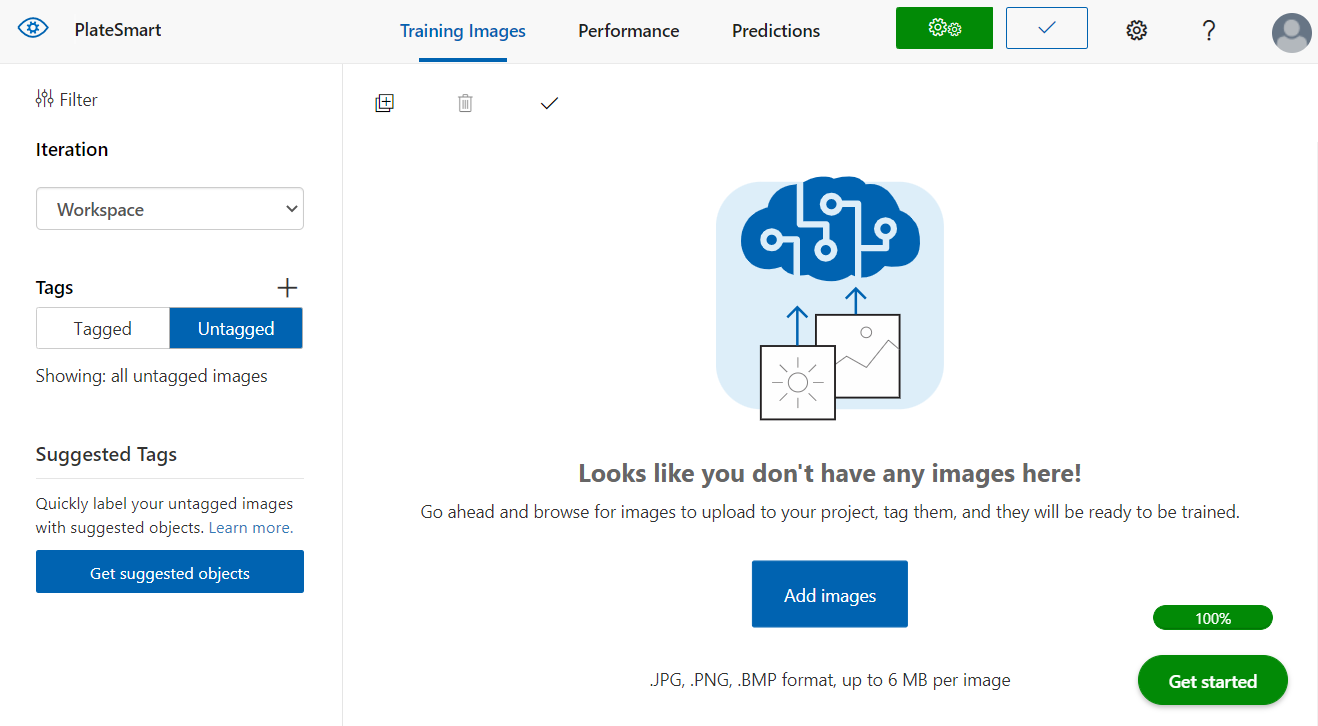
Once the project has been created you are presented with the main interface of Custom Vision you will be using throughout this demo. On the top navigation bar, we have “Training Images”, “Performance” and “Predictions”.

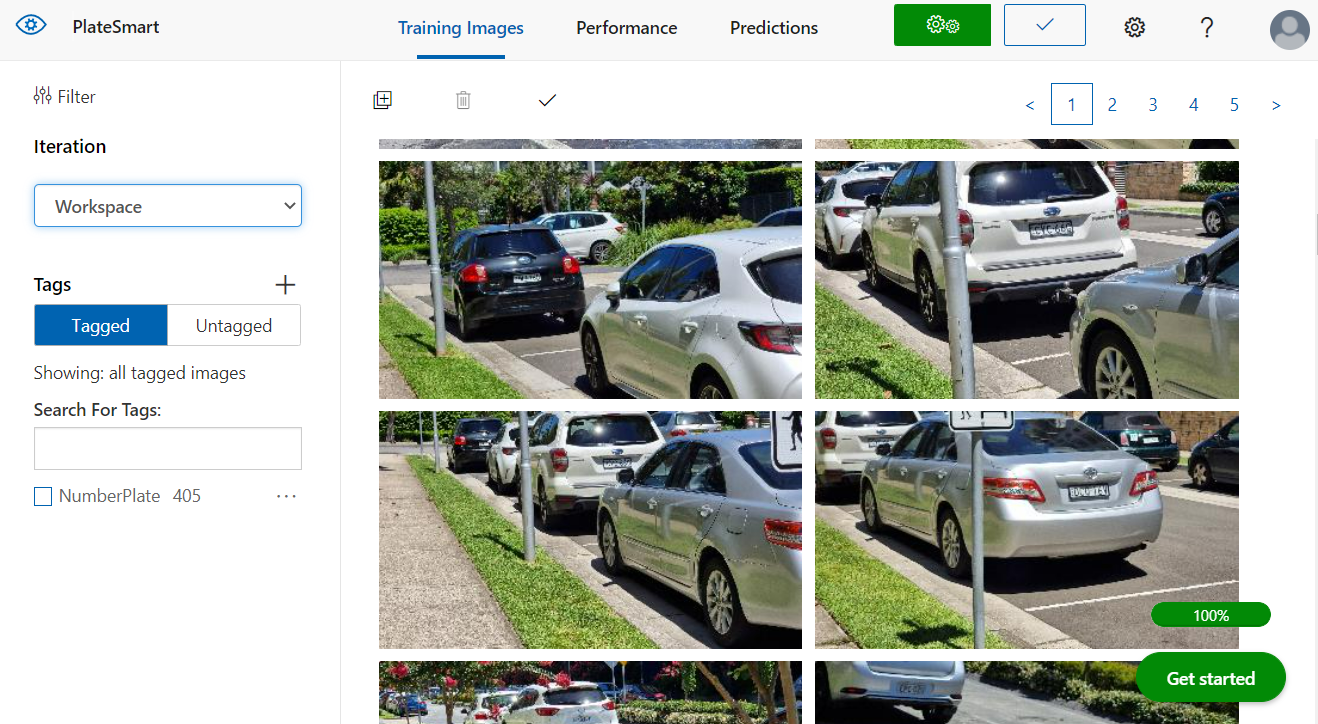
Preparing and tagging input data

Training Images is where we begin to upload images to start training the system into detecting the objects we want. Since there are no images, we can press the Add images button and upload some photos of cars. Microsoft recommends at least 30 images per tag to create something tangible to work with. I would recommend collecting a whole variety of images of cars and license plates.

If you lack data to use you can simply google for example “cars with NSW license plates” to find images to use. Alternatively, I’ve found that websites that allow individuals to sell their cars have adequate photos you can potentially use. If all else fails, go out and take some of your own photos!

The next step is to tag the images uploaded, you will see they show up under the untagged filter and clicking on one will bring up the image in full.

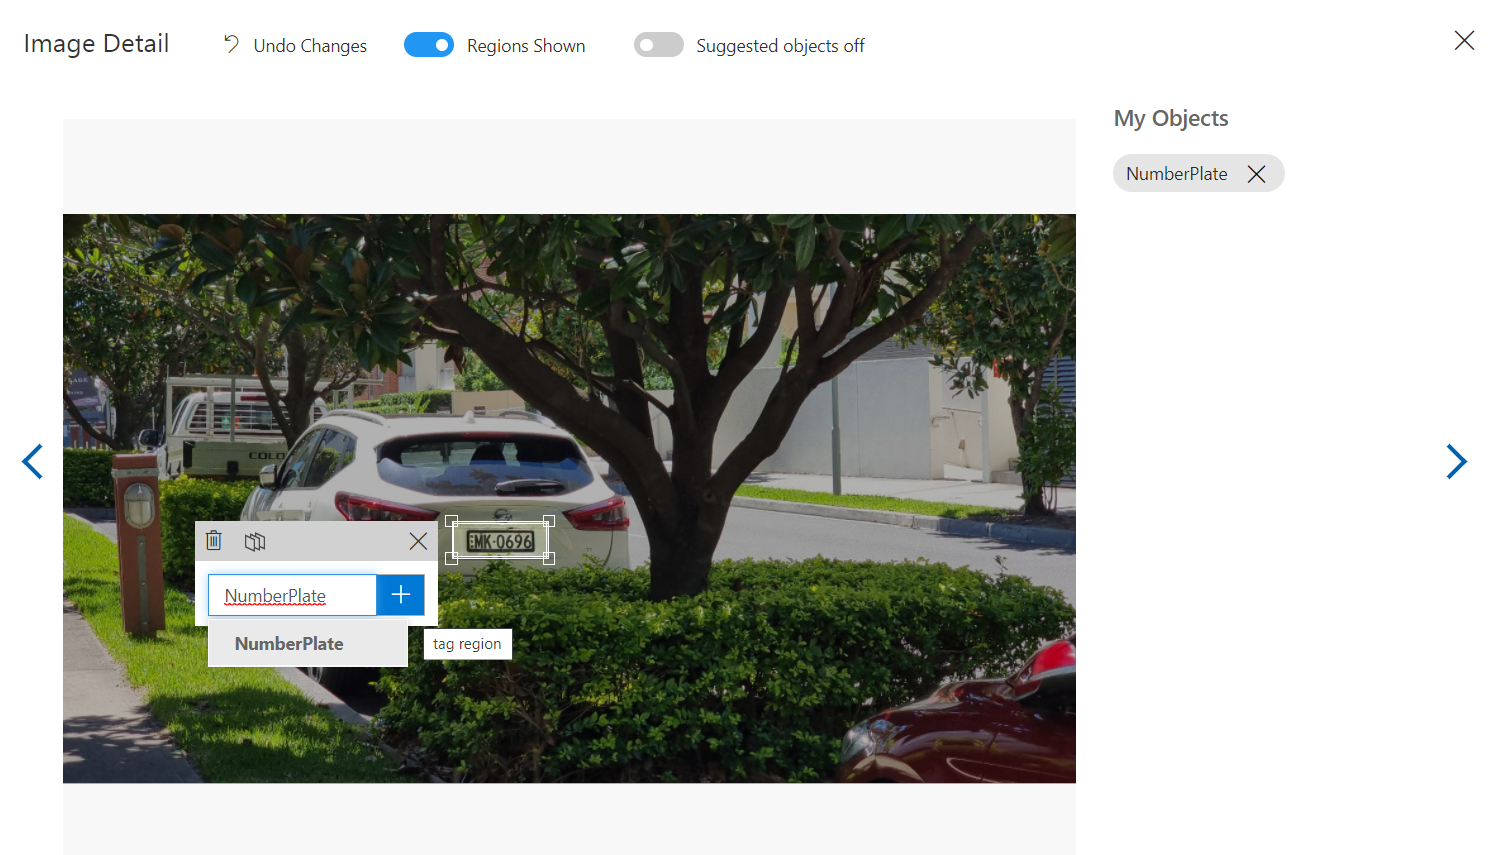
Custom Vision tries to guess and suggest several objects in the picture as a dotted box outline which you can click to help you tag elements faster. You can also manually specify the region yourself by clicking and dragging to set up a new tag.

Once you have gone through and tagged your images you can see now, they are filtered as ‘Tagged’ along with a summary of how many tags were used.

Training

The next step is training the system! You can do this by pressing on the green train button with the cogs. It will popup with a dialog modal asking you to select the training type. Since this is our first iteration you may go ahead and choose Quick Training and hit Train.

At a later stage when you add more images you can perform the advanced training option which asks you to set a budget of time. It also gives you a nice option to be notified via email when the training is complete.

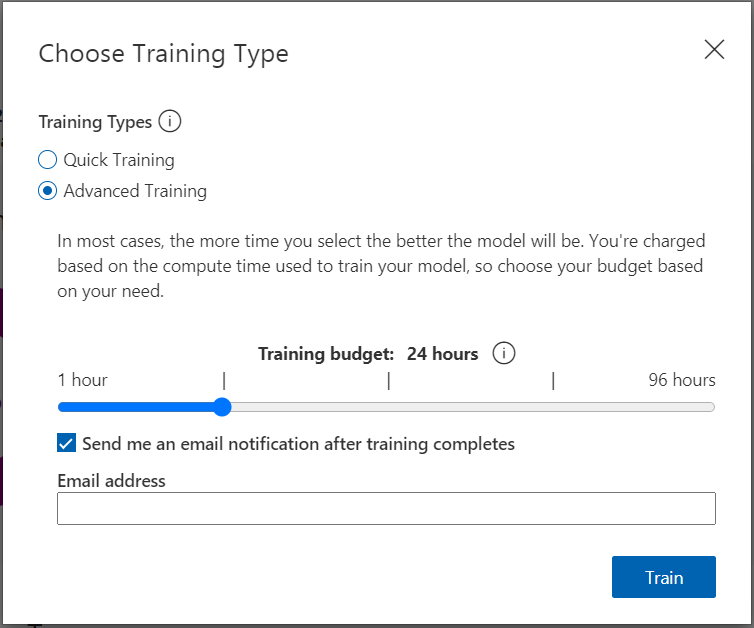
Since you have chosen the quick training option you can go get a coffee and come back to check periodically if it has completed.

Training Results & Outcome

Once the training is complete you can see the statistical results of your first iteration. Let’s run you through what each of these mean:

  1. Precision. This represents the accuracy of predictions by the model, for example if the predictive model identified 100 images of number plates which was run through it but only 91 of them were actual images of number plates then the accuracy would be 91%.
  2. Recall means out of the tags which should be predicted correctly, what percentage did your model correctly find? A similar example if there were 100 images of number plates but only 56 were identified by the model then the recall would be 56%.
  3. mAP (Mean average precision) means the overall object detector performance across all the tags. So, if you had more than one what the average precision would be.

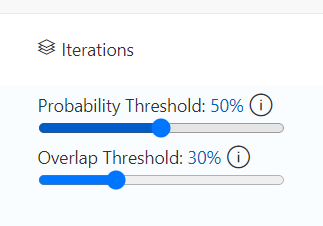
On the Performance Tab there are also two sliders, “Probability Threshold” and “Overlap Threshold”. These can be used to fine tune how you want the model to behave. The probability threshold represents the level of confidence a prediction needs to be deemed valid. If you don’t mind false positive results adjusting this can cause the recall value to increase while decreasing the precision meaning the images run through the prediction will have more objects detected.

Testing

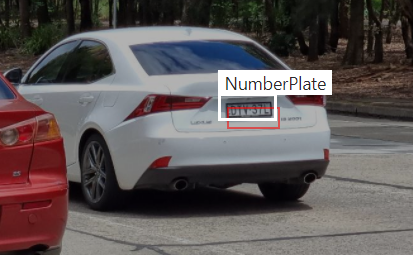
Now we can go ahead and test the model quickly to see how it performs. On the main page if you hit the ‘Quick Test’ button next to where it had Train it will bring up a window that lets you upload an image to run through the model.

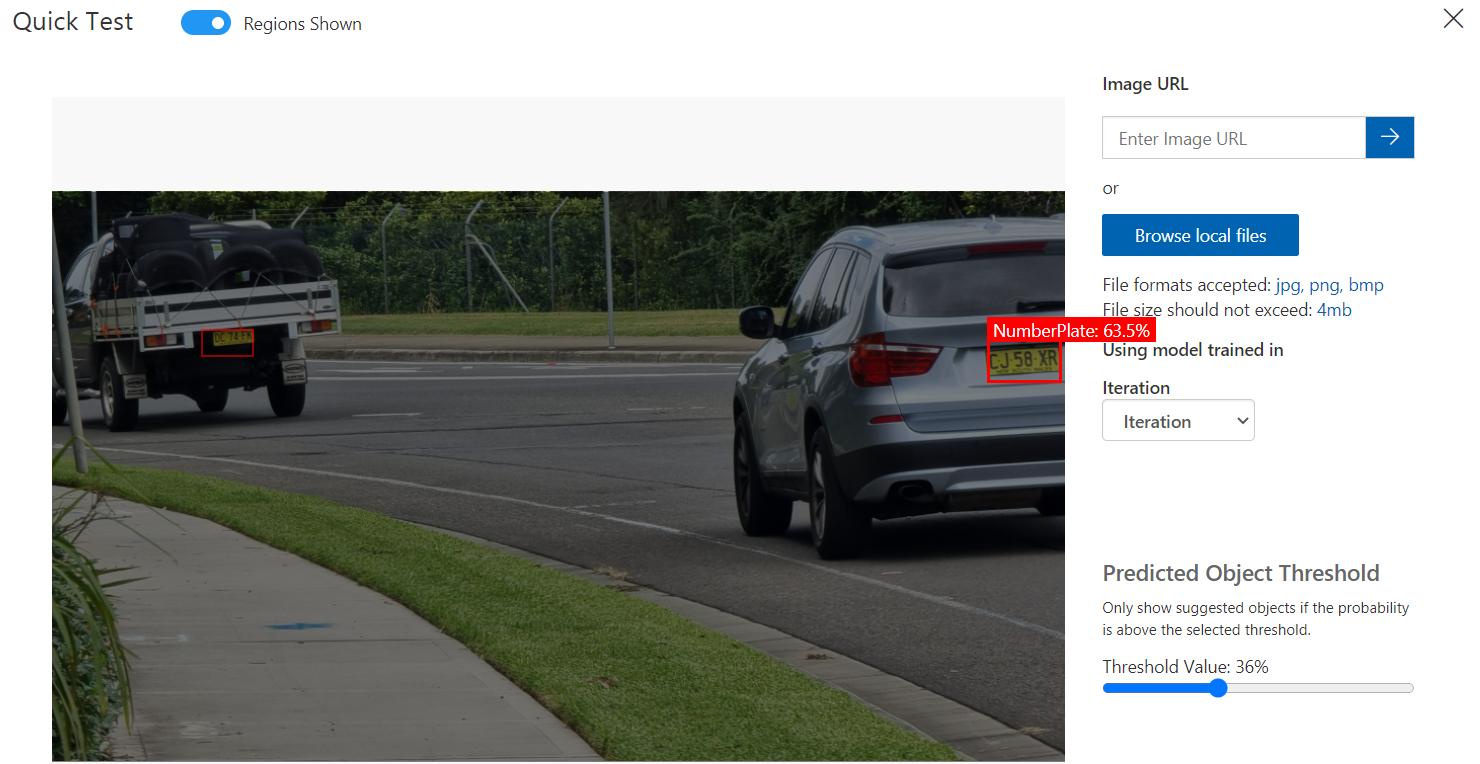
In this example we’ve uploaded an image containing two vehicles. You can see it has identified the number plates on both indicated by the red box. The confidence or probability percentage is also highlighted, the car on the right’s number plate has a probability of 63.5%.

There is also a useful slider there which lets you adjust the threshold filter so you can see what it predicted and the confidence it had when making those predictions at a certain level.

Publishing and putting this to use

Now that we have a working model Custom Vision gives us the ability to publish this on Azure into a resource service with an API. This will let us query images and get back predictions programmatically.

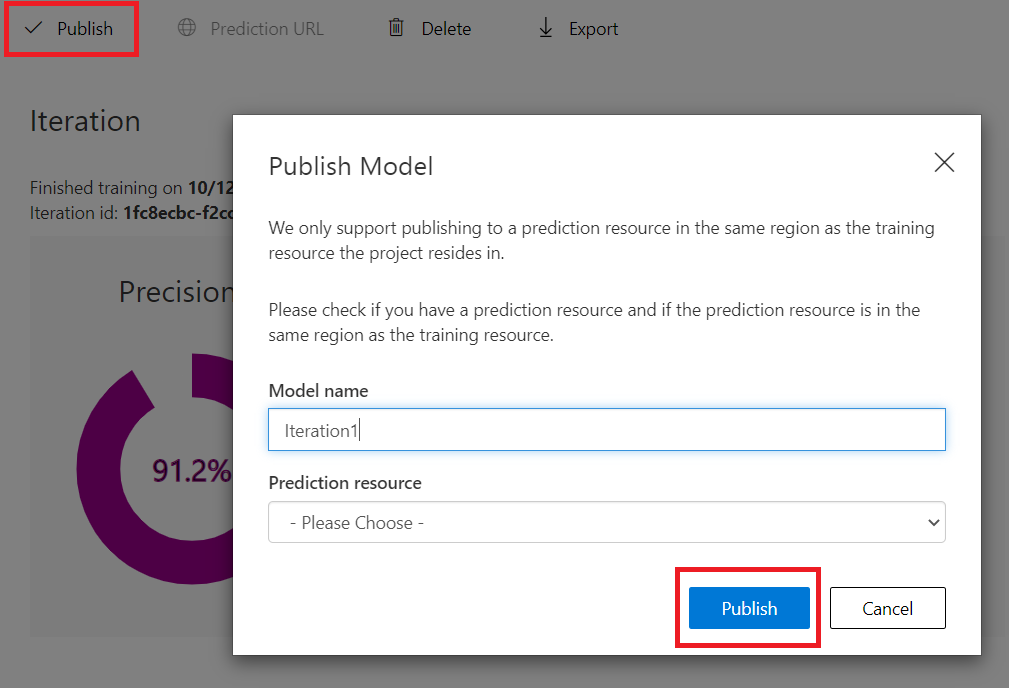
On the Performance Tab on the selected Iteration if you press on the Publish button it will present a window that lets you select to which resource you want to deploy this model and asks you for a name.

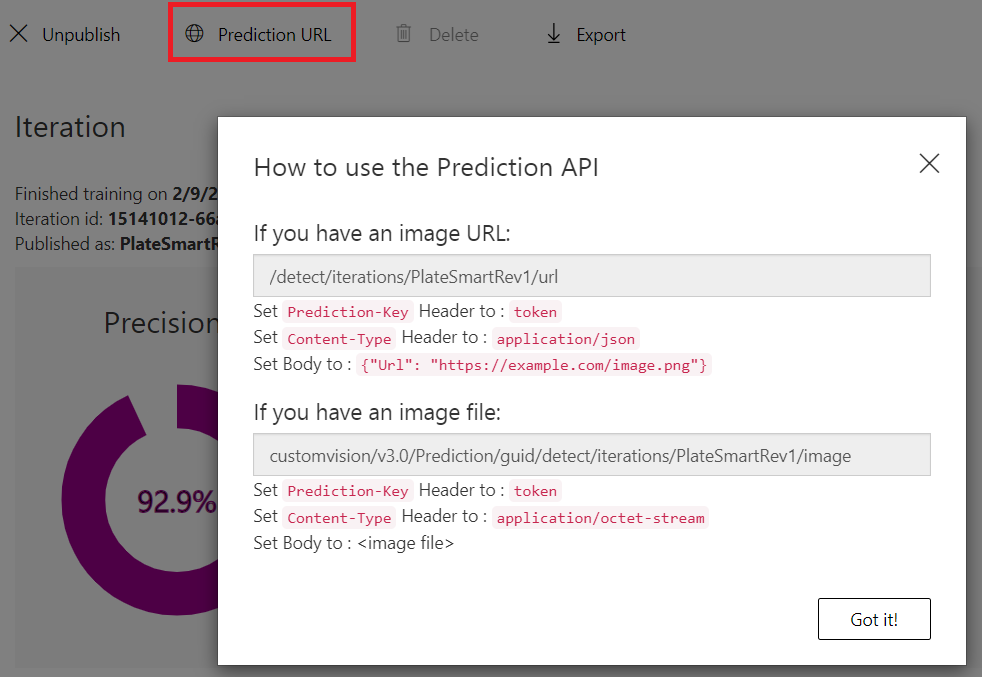
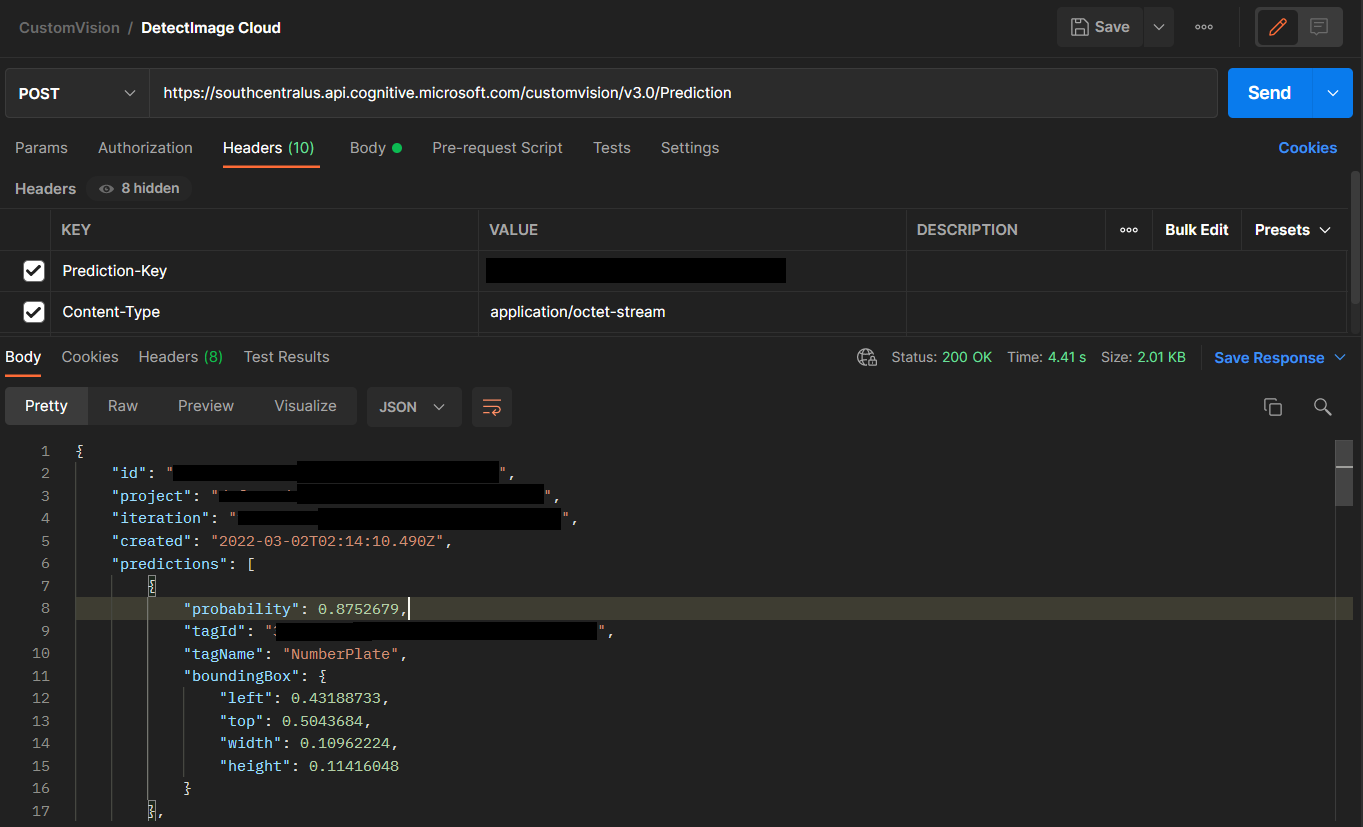
Once you have published the model you can access the prediction API URL. This gives you some information on how to call the API and pass in the required relevant data.

You can try these APIs with Postman and observe the response returned. A JSON object with an array of predictions that contain the probability, the tag id, tag name and the bounding box region of the detected object relative to the image are received.

Improving your model

Improving your model comes down to two things. Adding more good quality data and re-training. The last navigation menu option “Predictions” on Custom Vision shows you the images you have uploaded to test your model for a given iteration.

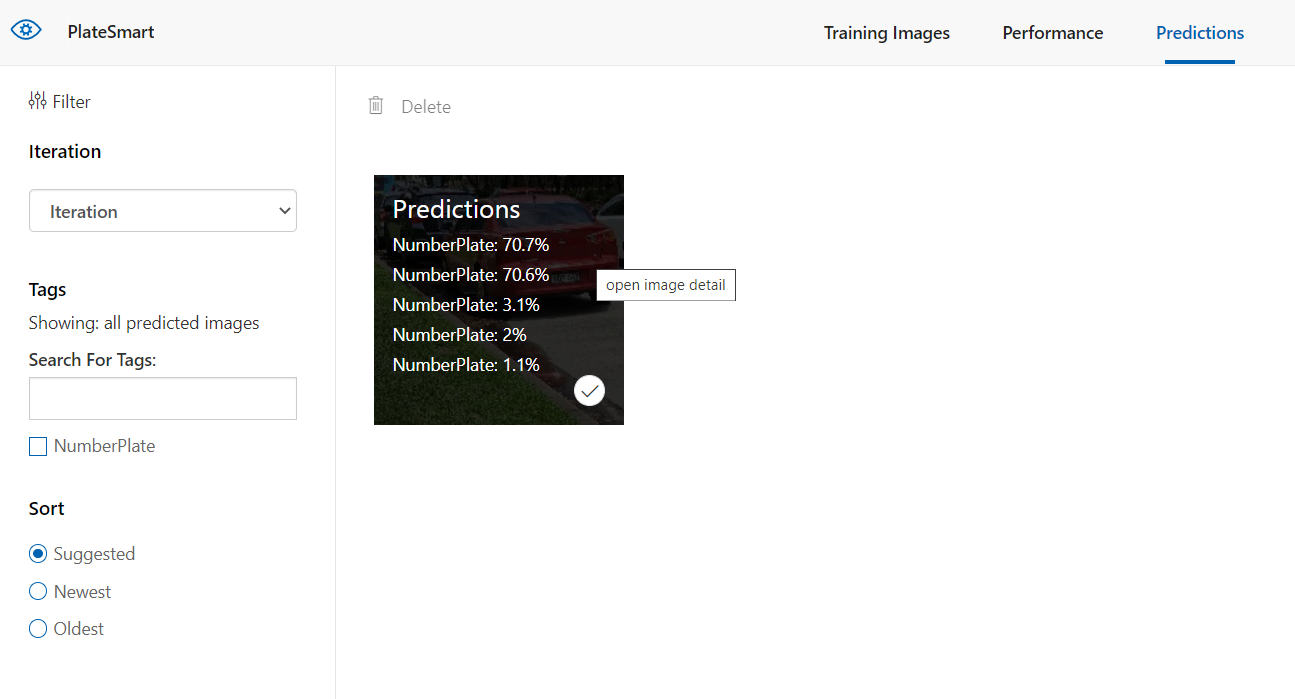
Clicking on each image here lets you adjust and remove wrong predictions made. In our case, sometimes the system would detect the body frame of the vehicle in the photo as a number plate, so we’d have to go into the image and redraw the region the number plate resided in.

You can see in this image the detected region is cropping the number plate characters so we had to adjust the size to cover the full area of the plate. Once you have done this process for a few images you can go ahead and train the model again creating a new iteration.

Data variety and quality

To improve the accuracy and quality of your model you need to provide it with a good variety of data. With the demo example of the number plates, we’d decided to only use dashcam footage screenshots of vehicles with their plates visible, but we slowly realised we were training the model to detect not number plates, but the rear bumper components of the vehicles in the shot. That only changed when we uploaded a variety of photos of number plates not attached to cars.

The official documentation explains this in greater detail under the section: “How to improve your Custom Vision Model”.

Speed and Practicality

Let’s discuss the topic of speed with this service. You may be concerned with the latency impact of making API calls to Custom Vision, or issues requiring you to be connected to the Internet. These concerns are all ones we’ve faced before using a Cloud Computing platform, however with Custom Vision it gives you the ability to export your model to a variety of platforms allowing it to run in an offline environment.

Exporting your model

You can check this feature out by going to the Performance tab on Custom Vision and hitting the Export button on the iteration you desire.

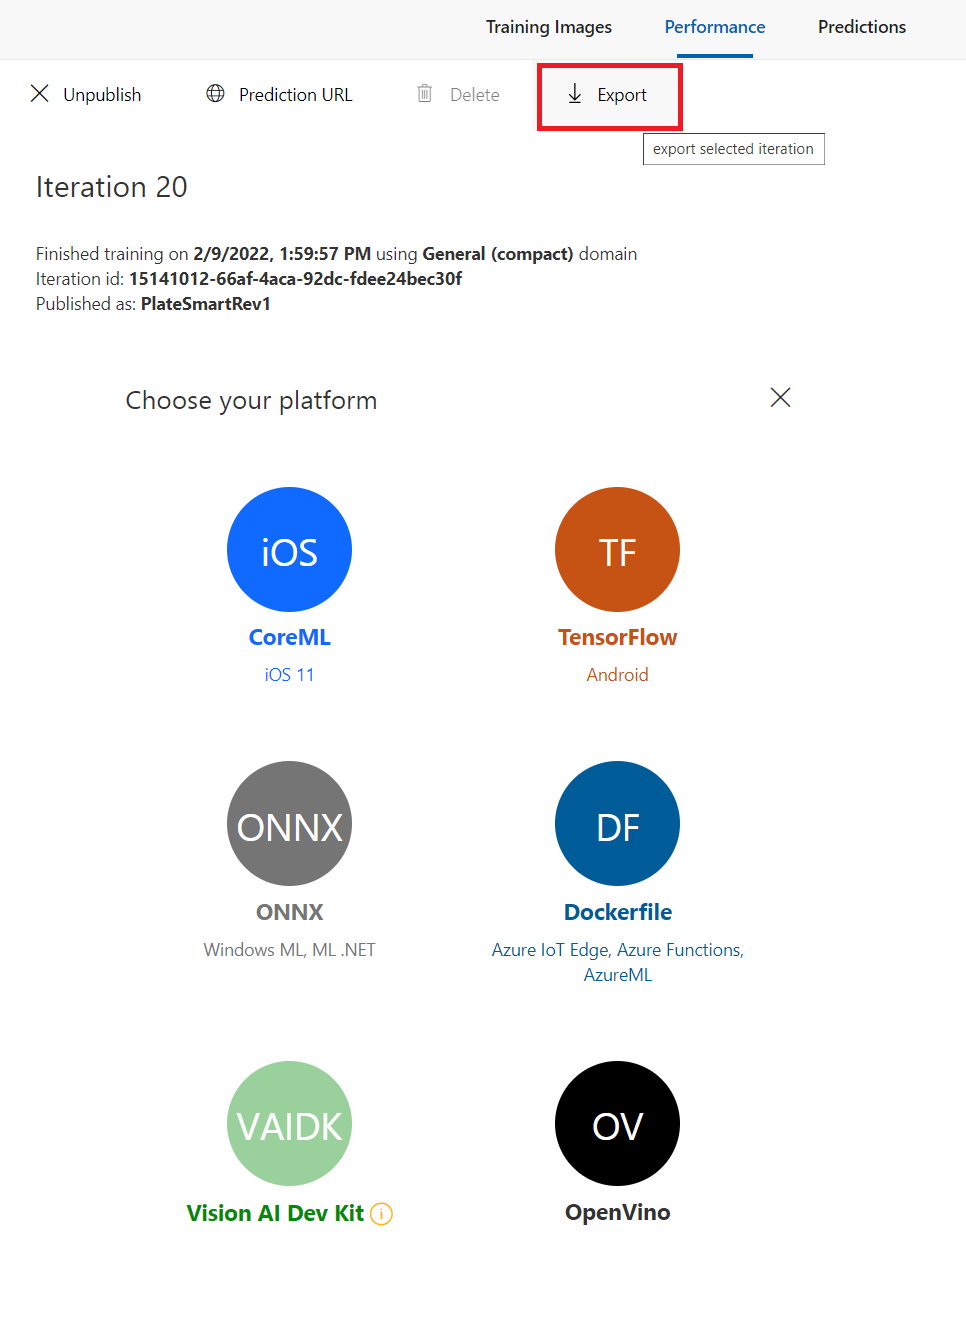
You can see on this screen we are presented with many different export options. To demonstrate the proof of concept we will go with the docker container image option. Select Dockerfile and on the popup modal set the export platform to Linux then hit Export. This will take a moment then present you with a Download button. Download the image zip file and extract to a new directory on your local machine. For more information on Docker and how Docker images work check out the getting started guide on the Docker website.

Deploying our Custom Vision Image Service on Docker

Once you have downloaded the docker image zip you can clone the demo project from my GitHub.

https://github.com/cihansol/CustomVision.

I’ve made it easy to setup the service using a simple PowerShell script. It will unpack, build and deploy it in your local environment. Make sure you have Docker installed along with the WSL 2 backend.

  1. Make sure Docker is running and it’s in your PATH Environment Variable.
  2. Export your own model docker image from Custom Vision or use the provided demo model and put it into the \Docker directory.
  3. Either drag and drop the .zip package onto the DragNDropRunWindows.bat or open a PowerShell window in the \Docker directory and type: ExtractBuildRun.ps1 1514101266af4aca92dcfdee24bec30f.DockerFile.Linux.zip where 1514101266af4aca92dcfdee24bec30f.DockerFile.Linux.zip is the name of the model package file.
  4. After it builds and runs it will display * Running on http://172.17.0.2:80/ (Press CTRL+C to quit). This will be the internal address the server is running at, it can be accessed locally at http://127.0.0.1/image
  5. To terminate the service in the console window press CTRL+C

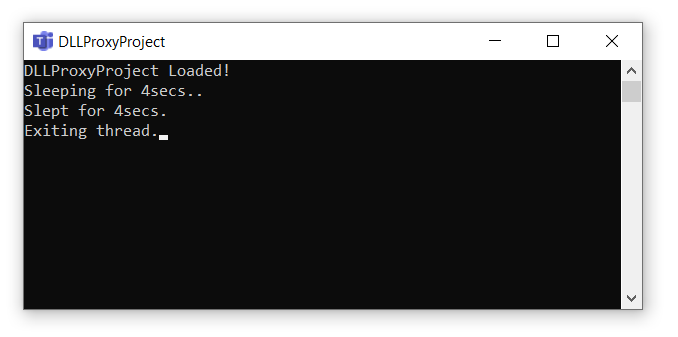
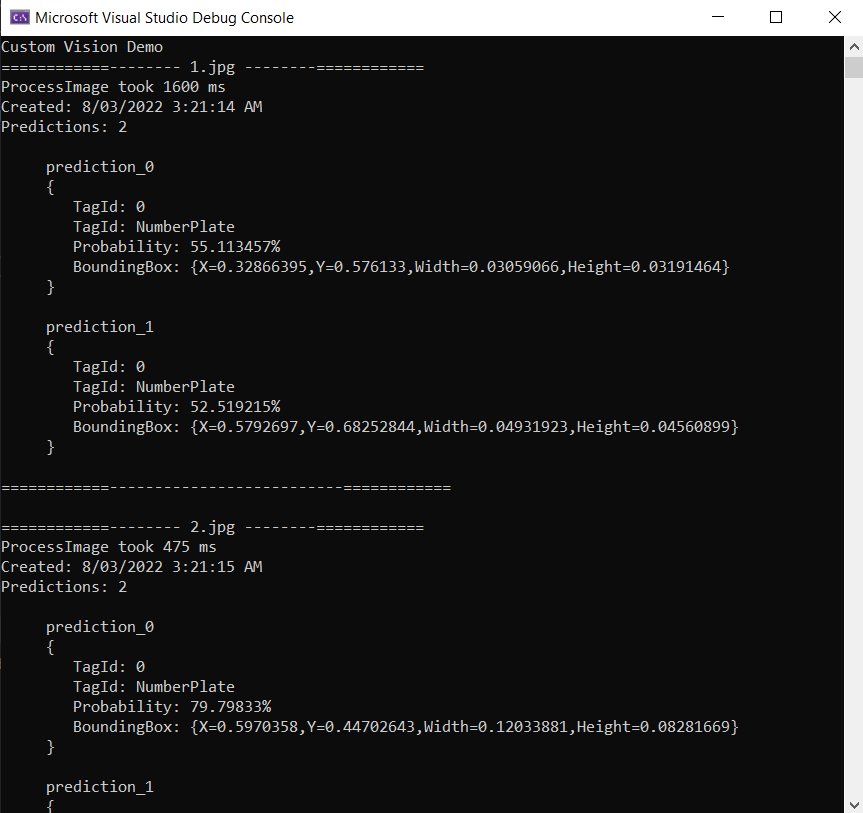
Building and running the demo will present an output like below. It will consume the images inside the samples directory and run them through the custom vision service you have running locally on Docker.

Conclusion

Machine learning’s success stems from the quality and variety of data that is processed. We’ve demonstrated how easy it is to build your own machine learning prediction model with the Azure Custom Vision service. We’ve gone through the detailed process involved with tagging input data along with iterating and improving the accuracy of the model. In the next blog post we’ll discuss how to apply object detection to real time video and the challenges and solutions to that problem.

Banishing Ads into the void with Pi-hole

Reading Time: 10 minutes

Opening

Advertisements are annoying! Some people find them useful however the majority I believe perceive them as bothersome and irritating. In this article I will explain how you can effectively block ads in your home and office network using a mechanism of the Internet called DNS filtering. This can all be achieved with a small yet powerful Raspberry Pi!

Background

First let me begin by giving you a little backstory on why I decided to write this post and how I stumbled across a great open sourced piece of software called Pi-hole. After purchasing a new Samsung Smart TV last year I came across something infuriating after connecting it to my home internet. You can probably guess by now where I’m headed with this… it had advertisements on it!

Firstly I thought to myself surely there must be a way to turn these off. I’ve paid for this expensive piece of hardware and now its showing me ads, this is ridiculous. I couldn’t find anything in the settings of the TV besides the ability to reset your Advertising ID via the privacy settings.

A quick google search bought me to the realization that there was actually no way of turning these off. A majority of people online seemed to be unhappy requesting it be removed, complaining to Samsung to no avail. This is how I came across a method of blocking these ads by creating a DNS server of my own.

Domain Name System (DNS)

To understand how DNS filtering works you will first need to understand what DNS is and how it works. DNS stands for “Domain name system“, and it’s purpose is to translate domain names (website names) into something a web browser can understand like IP addresses. Therefore, it is a crucial part of the Internet as we know it since how many IP addresses of websites can you recall? Not many or none I’m guessing. How about how many website addresses can you remember? A few I would hope.

How it works?

This schematic I’ve created below explains how DNS works.

  1. Each time you go to a website address such as Yahoo.com your web browser fires a request off to a special server (DNS Server) with the website name (domain name).
  2. Without getting into more complex detail that server takes this domain name and looks the location of the server that has it’s content. It then replies with the corresponding IP Address of that server on the internet.
  3. The browser then can connect to the source of where the website lives and retrieve all the content to display to you.

The process I have explained is not just limited to your web browser! Any application or service that sends web requests follows this operation.

It’s worth noting that this explanation provides the basic concept of how DNS works in the context of this article which doesn’t include the finer processes involved. There is an amazing video by Computerphile which explains DNS in a more detailed manner I recommend you to check out here.

DNS Filtering

The concept I will be explaining involves DNS filtering. So what is DNS filtering? Since now we know how DNS works we can use its mechanism to our advantage in blocking ad content.

If we look at a typical website like the example picture below you can see there are multiple elements on a page. The ones highlighted in red are ads that we would rather not see. When loading this page the web browser is doing several tasks to retrieve content on the page to display which includes these ads. You can see I’ve highlighted what domain names these advertisement elements come from.

Ad blocking

To block these ads shown above from being displayed or loaded we can simply not resolve the IP addresses of the ad domains requested. It is a very cheap and effective way of blocking ads and this can be achieved in many ways.

  1. Firstly for this to work we will need to have some sort of blacklist of domain names that are ads or ad related. This can be done by yourself or you can use lists created by others on the Internet.
  2. Secondly we will need to create a DNS Server of our own to resolve domain name queries for us and block out the ones that are on the blacklist.

An easier alternative is to use another DNS Server on your device or router that does this already. There are a few public ones such as Adguard which help you block ads by using their blacklist filters. Or something a bit more customizable such as Cisco’s OpenDNS that allows you to create your own blacklists through its Web Content Filtering feature. All these options however come with their own privacy concerns and aren’t very granular in terms of control. Thus, we will create our own using a piece of software called Pi-hole.

Pi-hole

Pi-hole is an open source application that runs on the network level it creates effectively what is called a DNS sinkhole. This can be conceptualized as a blackhole for domains that are identified to be on a blacklist. Any domain passing through the Pi-hole that is identified as an ad will fail to be resolved. This will result in the Pi-hole DNS server returning nothing for the client to connect to, failing the DNS query process explained above.

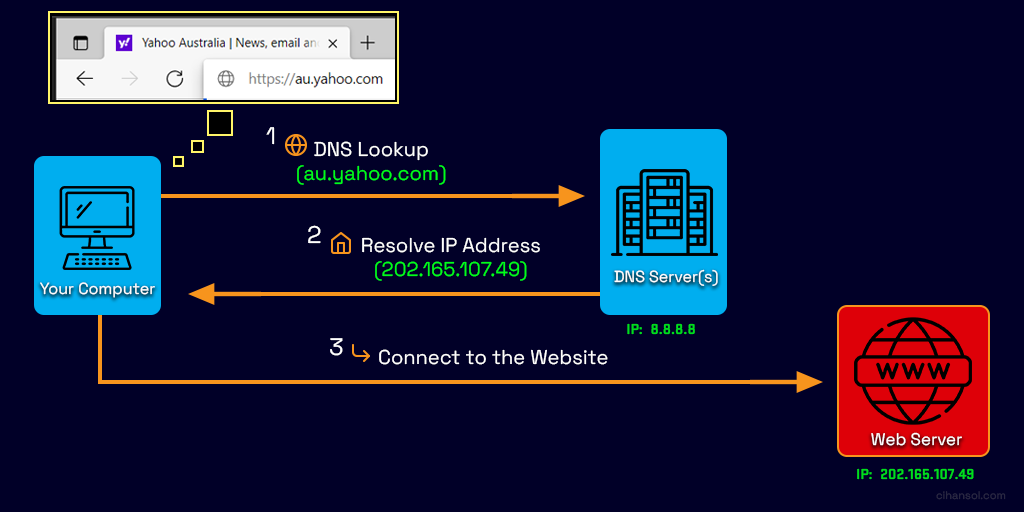
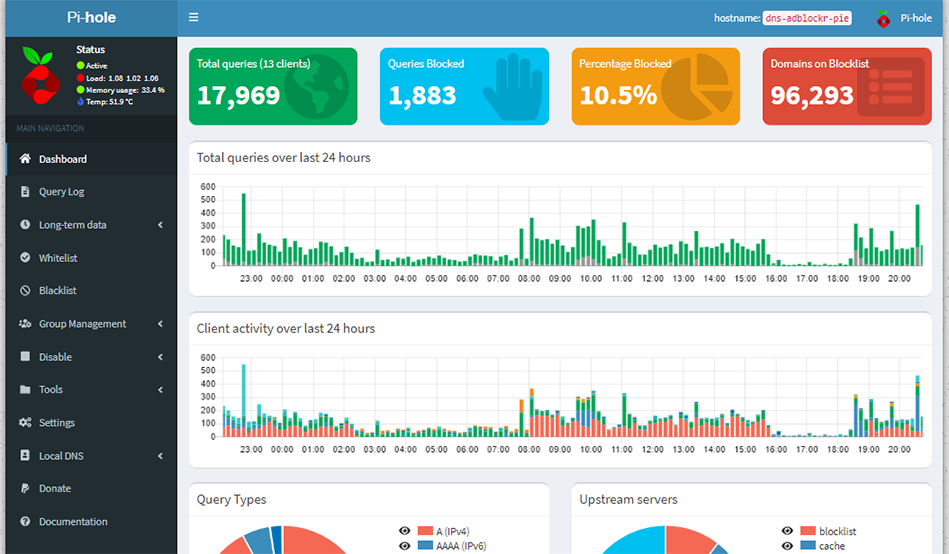
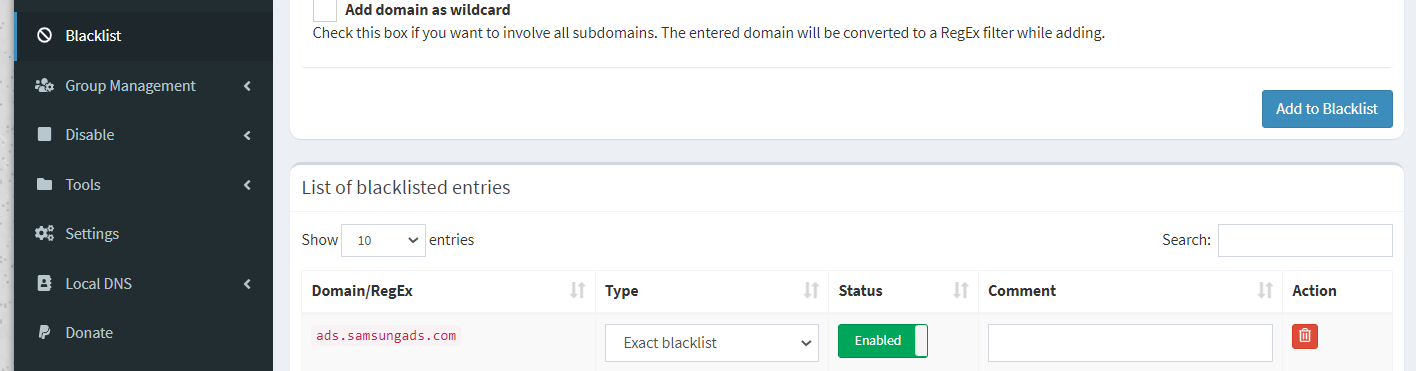
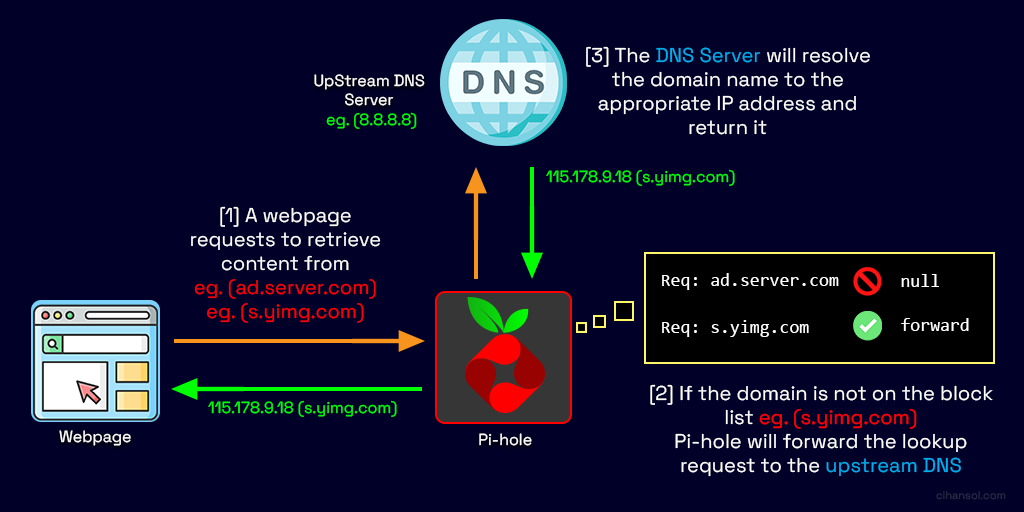
Using Pi-hole we can also effectively control domain access on our networks creating our own blacklist for websites that may be malicious or dangerous and this can also assist in filtering out adult content for the young ones or employees in your home or office network.

Raspberry Pi Zero W

For this guide we will be using a Raspberry Pi Zero W however any Raspberry Pi can work. The benefits using the Pi Zero W is it’s form factor being smaller than its predecessor device yet more powerful and the W variant means it comes with built in Wi-Fi and Bluetooth (4.1 + BLE).

You can source yourself one or find out more information about it via

I picked one up for around $18 AUD from an online local reseller. We will also require a few additional items for this project. These include a MicroSD card to store the Operating System (OS) and data along with a power adapter to power the device.

Setup

Once we have all our hardware we will need to prepare the SD card to install the OS. Here is a quick setup guide providing links to adafruit.com a great place to learn and create projects with electronic hardware. I will be using Windows for this guide but the concepts apply similarly on Mac and Linux.

  1. Download the latest ‘Lite’ Raspbian to your computer
  2. Burn the Lite Raspbian to your micro SD card using your computer
  3. Re-plug the SD card into your computer and set up your wifi connection by editing supplicant.conf. (Note you will need to use a 2.4Ghz SSID)
  4. Activate SSH support
  5. Plug the SD card into the Pi Zero W
  6. If you have an HDMI monitor you can connect it via a mini HDMI adapter to the Pi Zero. This helps seeing the bootup process so you know everything is functioning correctly but is not a requirement.
  7. Plug in power to the Pi Zero W – you will see the green LED flicker a little. The Pi Zero will reboot while it sets up so wait a good 10 minutes
If everything is good you should see a green light and should be able to access the device via SSH.

Pi-hole on Raspberry Pi Zero W

SSH

Before we can proceed to install Pi-hole we will need a way to interface with the device, this can be achieved by opening a Secure Shell (SSH) connection. For that we will need a SSH client. In this guide we will use one called Putty which you can download from here.

After running the SSH client Putty we need to acquire the IP address of the device to connect to it on your local network. You can optionally connect to it via the raspberrypi.local name however, I personally found it was easier to find the IP address of the device through my router’s admin configuration panel. You can do this by looking for a device with the vendor name “Raspberry Pi Foundation” or MAC address starting with “B8:27:EB“.

We can then configure and connect to it by typing in the address and selecting the SSH option. Additionally you can also set the username by going to Connection->Data in the Category List and setting the “Auto-login username” to pi, followed by saving the session settings. This helps speed up the connection time so you only really need to type in the password next time you connect.

Clicking on the Open button will display the terminal window which may prompt you to enter the password for the user pi. Typically the default password is “raspberry” however this may change depending on the OS installed.

Once logged in you should see the terminal window similar to the image below:

Configuration

Once we have connected successfully to the Raspberry Pi Zero W there are some configurations we can make to better identify the device. One of these is setting the hostname. We can go ahead and change this via the command:

sudo nano /etc/hostname

This will bring up the nano text editor where you can configure the name to what best represents this Pi. In my case I have it as “dns-adblockr-pie“.

Control + O, Control + X to save and exit confirming the output when asked. To learn more on how to use the nano text editor check out this article.

We will then need to also change the hosts file to also mirror this via the following command.

sudo nano /etc/hosts

Change the last line with the same name you set in the previous file then save and exit.

Pi-Hole Installation

The easiest method by far to install Pi hole would have to be this one:

curl -sSL https://install.pi-hole.net | bash

It will guide you through a command line installation wizard which may prompt you at stages to pick certain configuration options. If you would like more information or alternative means of installation you can check out the Pi-hole website.

Here are the options presented and what you should pick:

  • 1. Upstream DNS Provider [Google or CloudFlare]
    • This is what we talked about in an earlier diagram, it will receive the traffic that isn’t blocked by Pi-hole to resolve IP addresses.
  • 2. Third Party Block List [Stevenblack’s Unified Hosts List]
    • Select the default list that appears you can modify this later if you wish to change to another list.
  • 3. Protocol (IPv4)
    • Lets stick to ipv4 unless you require otherwise.
  • 4. Current Network Settings as static
    • This option if presented will attempt to set the current IP address assigned to your Pi as the permanent address that will be used; Effectively your DNS server IP.
  • 5. Do you wish to install the web admin interface? [On]
    • You want to definitely enable this option. It will allow you to view the queries coming into your DNS server along with useful statistics and the ability to setup your own blacklist entries easily.
  • 6. Install the lightppd web server [On]
    • Leave this setting as recommended
  • 7. Do you want to log queries [On]
  • 8. Privacy Mode [Log Everything]
    • This option is really up to you, if you decide to not log domain entries it may be difficult to block future ads that are not in the blacklist.

Once the installation completes it will present you with a final screen showing you the default admin webpage password that was generated. Write this down as you will need it to access the web interface, you may change this password at a later point in time.

Congratulations you have successfully setup Pi-hole! You may now proceed to set the DNS server on your router or devices connected to your network.

You should also make sure to reserve the IP address assigned to the Raspberry Pi. If in the case the IP address changes it will break all clients connected as the once known IP address of the DNS server (Pi) will no longer be valid.

Admin Interface

The admin interface can now be accessed by your web browser using the Pi-hole’s IP address.

http://192.168.1.50/admin

You may change the default password presented to you in the final screen of the installation wizard with this command:

pihole -a -p

Effectiveness & Tweaks

You may now load a website that contains advertisements to see if the ad filtering is functioning correctly.

In the above screenshot you can see on the right side snapshot there are ads that appear at the top and on the left sidebar. The left side however has empty space where these ads would normally load.

You can also add in your own entries to the blacklist if you find any that doesn’t get blocked.

The effectiveness of this method does have issues. DNS filtering offers a very ‘crude’ method of filtering. It will not remove white spaces left behind or in some cases the frame where ads would normally be placed may appear broken like in the following screenshot:

Regardless it is still an effective method of filtering ads and in my situation it did in fact get rid of the banner ads that appeared on my Smart TV along with various apps on my phone. It also unlocked a lot more control over traffic on my network.

Conclusion

Pi-hole providers a great way to filter advertisements on your local network and opens up a lot more opportunities for finer network traffic control. In a future post I may cover how to connect a small OLED screen to your PI to display statistics and device information. Until then happy ad blocking!

Links & Resources


Windows DLL Proxying/Hijacking

Reading Time: 7 minutes

Concept

A while back I was working on a add-in/plug-in for a software that would enhance it’s functionality. I found that the easiest and most pain free way of loading arbitrary code was via a method referred to as DLL ‘proxying‘ or ‘hijacking‘. This method is unfortunately abused and most commonly used in malware prompting Microsoft to outline ways to secure your applications when loading libraries to prevent such attacks. In this post I will run you through the process of how this method works, this will also help you gain a better understanding of the internal functionality of the Microsoft Windows Operating System.

Dynamic Link Library (DLL)

First, you may not know or be wondering. What are DLLs? DLL stands for Dynamic Link Library and they are the core libraries that contain functional code or resources used in Windows applications. They share the same Portable Executable (PE) file format as .EXE files. For this post I will touch briefly on the structure in order to explain the DLL proxying process.

Microsoft’s implementation of the shared library concept allows the use of written code amongst multiple applications. For example ‘ApplicationA‘ can load a library titled Common.DLL and call a function in that library that does the addition of two integers. Subsequently ‘ApplicationB‘ can also load that library and call the same function. The function in the library is effectively shared between the two apps. For this reason libraries expose functions which get stored in a structure called the export table inside the DLL. You can read more about the PE format here.

dll export table
Above is a screenshot showing the exported functions of a library called sample.dll

Windows DLL Loader

The Windows DLL Loader or known as the PE Loader is responsible for loading these libraries on either startup of a program or at runtime when they are required. When attempting to load a library it adheres to a defined search order. Below you can see the default order of which the loader attempts to search for the requested library to be loaded. The order will differ when safe DLL search mode is disabled.

Above is a diagram showing the default DLL search order in Windows.
  • Initially it will first attempt to look inside the process memory to determine if the library has been previously loaded.
  • Next it will look inside the KnownDLLs registry entry located at: HKEY_LOCAL_MACHINE\SYSTEM\CurrentControlSet\Control\Session Manager\KnownDLLs to see if any match the name.
  • The subsequent location is the application directory. This directory is of importance to us for this method to work.

You can find a more detailed explanation of each location by reading through the Microsoft documentation.

How does DLL proxying or hijacking work?

The DLL search order can be exploited to trick a target application to load an illegitimate DLL library. This can occur if there is no explicit path specified when loading a library. For example, if an application wishes to load a DLL called Example.dll without specifying it’s location the Library Loader will commence a search using the ordered list. Once there is a file located with the exact library name it will be loaded into the running application’s process memory. The library loaded will then be prepared to have one of it’s exported functions executed.

To highjack this flow we can place a DLL library that we have crafted in a location that is early on in the search order. This will result in our DLL being loaded for execution rather than the original intended library which may be located further down the search list.

It is important to note that for this to work in a stable manner we must create what is known as a DLL wrapper to expose the same functions that are exported by the original DLL library. If we fail to do so when our library is loaded the function call intended will fail as it doesn’t exist.

Below is a diagram to demonstrate this where a application process wishes to call a function titled “FunctionA” in the library Example.DLL.

Here is the process outlined:

  • The Windows PE Loader will use the search order list and scan to locate a library called Example.DLL
  • It will fail to locate the library in process memory and the KnownDLLs registry entry finding a matching file in the application directory instead.
  • This file is not the original intended library but our wrapper DLL. The exported functions by the original DLL are mirrored in our wrapper using DLL Redirection which in layman’s terms tells the loader to look elsewhere for the origins of FunctionA.
  • The loader will then load Example_Org.DLL which was the original library intended to be loaded.
  • The loader will then locate the exported function FunctionA inside the export table of Example_Org.DLL and attempt to resolve it’s virtual memory address so it can be called and executed.

Locating susceptible DLLs

We can utilize a tool mentioned in one of my previous blog posts to locate libraries that are susceptible to such an attack. Process Monitor by Mark Russinovich has the ability to monitor library load calls and using a certain filter it is possible to discover DLLs that fall into that category.

In the example below I will explain how code execution can be acquired on Microsoft Teams by using DLL proxying/hijacking.

If we set the filter on Process Monitor to locate DLLs being loaded by Teams.exe with the Result of NAME NOT FOUND it can be observed that once the application is run we get quite a few matching results matching the criteria.

Creating a Wrapper/Proxy DLL Library

Following the example above with Microsoft Teams we can choose one of the DLLs present in that list to perform this. In this demonstration I have chosen to go with the library VERSION.DLL. This library provides helper functionality that deals with files and file attributes.

A C++ Native DLL project will then need to be created that exposes the same functions exported by this library. I have provided an example project on GitHub we can use.

Opening the original DLL library in PeStudio we can observe the functions it has exported. Usually you can locate the original file (if it exists) in the System32 directory.

A screenshot showing the exported functions by the Version library

Our next step is to mirror these functions exported in our wrapper DLL library without copying any implementation over but instead redirecting them back to the original.

This can be achieved by using a command line tool I’ve created called PEExportGen which you can download from GitHub.

PEExportGen will take an import library, parse it’s export table and create a C++ header that contains export definitions that the C++ Compile Linker can use to create the wrapper DLL.

The output result of running VERSION.DLL through PEExportGen is a header will that we can include in our project DLL Proxy Project.

To demonstrate this proof of concept inside the DLL Entry Point we create a new thread to execute the following:

After this we can build the library, ready to be deployed.

The final step is renaming the original DLL Library to VERSION_orig.DLL and our newly compiled wrapper as the original’s name VERSION.DLL.

You can see in this screenshot the wrapper we have built does not contain a version number or description. The original however has this information.

Both files then can be dropped inside the application folder next to the Teams.exe executable. This directory is typically located at:

C:\Users\%USERPROFILE%\AppData\Local\Microsoft\Teams\current

Running the targeted Application

After the crafting and deployment of the wrapper DLL we can proceed to run the application Teams.exe. You should see a console window popup with our intended output. This demonstrates how arbitrary code can be executed inside a process with DLL proxying/hijacking.

Mitigation and Security

To prevent this type of hijacking there are a few steps you can take to ensure this risk is mitigated in your application. When you wish to load a library providing a full path is the best approach.

HMODULE handle = LoadLibrary("someLibrary.dll");

The above call to LoadLibrary will result in the search order to locate the library. The right way to load the library would be to supply its full file path.

HMODULE handle = LoadLibrary("C:\\Windows\\System32\\someLibrary.dll");

In some situations where the file path can not be determined it could be possible to locate the file yourself by checking it’s hash or digital signature (if it is signed).

There are other ways to omit searching certain paths by using the Flags attribute in LoadLibraryEx. Another common mistake developers may make is using LoadLibrary to determine if a Library exists on a system, this is not good practice and other avenues should be pursued to accomplish this.

Finally it is important to have the appropriate directory permissions for your application. If the app directory is not writeable it will reduce the risk significantly.

Conclusion

This method of code execution has been around for quite some time in Windows, I hope through reading this post you have a better understanding of how libraries are loaded. It can be evident without proper care this method can open up your program or application to vulnerabilities. It also however can be used in a non malicious way to load/modify/enhance an old legacy application for instance that might not work due to incompatibility or lack of interoperability.

Links & Resources

Unpacking Xamarin Android Mobile Applications

Reading Time: 5 minutes

Recap & Introduction

In my previous post I detailed how to decompile .NET code and explained how this was possible given the nature of the .NET platform. This post will walk you through how to unpack and decompile android mobile applications built on the Xamarin platform. Additionally I will also talk about a utility app I have created to automate the process. The procedure outlined in this guide will assist you in analysing and reviewing code inside Xamarin android applications.

Xamarin

If you have never heard of Xamarin it is an open-sourced platform for building Android and iOS apps with .NET and C#. For this post I’m going to focus on applications built with Xamarin for the Android OS. You can read more about Xamarin here for a deeper dive. Don’t get too invested in it though as Microsoft is looking to merge Xamarin.iOS and Xamarin.Android as apart of the .NET unification process with .NET 6.

The unpacking process

In order to demonstrate I’ve created a example Xamarin android app which you can clone from my blog demos repo. Build the android-xamarin-MobileApp project and test it works on your mobile device.

Let us start with a brief understanding on how these android apps are built. Similar to my explanation on how the .NET platform works below is a diagram that demonstrates that build process with Xamarin.

An overview of the build process from source code to a deployable application package.

Essentially your source code gets compiled into CIL (IL) instructions that are stored in Dynamic Link Library (DLL) managed assemblies. The android package builder then bundles these along with app resources and other data into an APK package. The package then can be installed either ad-hoc via sideloading or deployed to an app distribution platform such as the Google Play Store.

Build Process Changes

It is important to note that there are various options and settings that can influence what the APK contains. For example, when you are building you may select the option shown in the diagram below to bundle assemblies into native code. The tool tip displayed in Visual Studio suggests this option protects the managed assemblies from examination but you will soon see that this not so true.

To explain why this impacts the unpacking process I’ve created a diagram that shows the differences focusing on the steps that occur between the package bundler and the final output APK.

Unbundled Build (Default)

This option is the default when building an app. The package builder will utilize LZ4 Compression and create files with the .dll extension. These files contain the compressed assemble with a custom header file that consists of a magic identifier ‘XALZ’, an index into the internal assembly descriptor table and the uncompressed size of the assembly. The files will then be put into a directory titled assemblies and packaged into the APK.

A traditional Xamarin Android APK package build contents open in 7zip File Manager
Bundled Build

When selecting the “bundles assemblies into native code” option, the package builder will utilize another compression algorithm, this time using GZip to compress each of the assemblies into the data segment inside the shared library titled libmonodroid_bundle_app.so. The shared library is then stored inside the lib directory which is packaged into the final APK.

A Xamarin Android APK package with ‘bundle assemblies’ checked open in 7zip File Manager

You can probably observe that the unbundled build will be fairly straight forward to unpack. The latter however requires a little more effort. First we must parse the shared library object then decipher where the data is stored and extract this.

Unpacking Strategy

My approach to unpacking these libraries consists of two parts.

Firstly an APK can contain libraries targeting different architectures. These are organized in the the lib directory like:

I’ll be explaining the process with the the ARM64 version however the exact same process applies for ARM. Having a look at the libmonodroid_bundle_app.so inside IDA we can see that the .data section contains a list of RVA references to each of the packed assemblies. These actually point to a data structure we will call ‘bundle entry’.

Each bundle entry structure looks like this:

This is sufficient enough to provide us the name of each file along with compression sizes both packed/unpacked. The data pointer field however inside the file is empty, this is because at runtime that is dynamically populated by the system image loader. Although we can resolve this with some work a simpler option is to find the matching compressed segment.

This brings us to the second part which involves searching for the GZIP streams inside the .rodata section. We  can achieve this by searching the magic numbers 0x1f  0x8b which make up the first part of the 10-byte GZIP header. This method however may present false positives as there could be data anywhere in there containing a 0x1f  0x8b sequence so we need to check the uncompressed size present at the tail end of a GZIP stream which is a 4byte unsigned integer. If the uncompressed size present in the current bundle entry matches the one at the end of the found GZIP stream then we have a match.

Unpacking Tool – XamAsmUnZ

Luckly for you I’ve created a small CLI tool that does this all for you. All you need to do is extract the APK package with an archive tool such a 7Zip, provide the tool with either the assemblies directory or the location of the libmonodroid_bundle_app.so and the tool will take care of the rest.

You can find the repository for that here or the release binaries here.

  • Example usage for an “Unbundled” build
    • XamAsmUnZ -dir "C:\com.cihansol.mobileapp\assemblies"
  • Example usage for a “Bundled” build
    • XamAsmUnZ -elf "com.cihansol.mobileapp\lib\arm64-v8a\libmonodroid_bundle_app.so"

The output binaries can then be viewed inside a decompiler like dnSpy to inspect code and logic.

Conclusion

Unpacking Xamarin android apps are trivial and this can be useful for code analysis and reviews. Within this blog post, I have demonstrated how Xamarin apps are built and packaged for the Android environment. Through a personal outline I have shown the procedure involved in unpacking .NET assemblies which can later be decompiled back into source code. The significance of this blog post highlights that it is very easy to dissect mobile applications built on the Xamarin platform. We can see that the bundling option available through the build settings does not provide the security it is perceived to perform.

Further Reading & Relevant Links

Decompiling .NET Code

Reading Time: 7 minutes

Introduction

When you build an native application your written source code gets compiled down to a language that can be understood by the target processor you’re developing for (eg. ARM), this is referred to as machine code or assembly. Decompiling such applications are not possible as there is information that gets lost during the compilation process which can not be recovered to produce the original written code. There are ways to decipher and make sense of such code such as disassembly however, that is not the focus of this blog post and I will cover that in another write up.

Disclaimer:  This post is written in good faith for educational purposes only. I’m not responsible for the misuse of the information provided here along with the use of the tools and methods mentioned. I also do not assume responsibility for the actions carried out with the knowledge provided. Please be aware of End-user license agreements before attempting to decompile a third party’s software or application code.

.NET Platform

Working with .NET we have the luxury to recover a lot of what was originally written. The compilation process is far more involved utilizing a runtime for execution, and the output result is referred to as “managed code”.

Below is a diagram I’ve created to display the process starting from your written source code all the way to where the target architecture executes the compiled binary. The power of .NET comes from its ability to run on many different architectures similar to Java. It also takes the burden of memory management and type safety away from the developer allowing the focus to be on the accomplishment of their specific task or problem.

For this example I’m going to use the C# programming language but this also applies to all other high-level languages supported by .NET.
  • Firstly, your written source code gets compiled by the C# Compiler generating Common Intermediate Language (CIL) formally known as IL. The compiler also generates metadata on your application that enables seamless integration of components. This methodology allows .NET languages to describe themselves automatically in a language-neutral manner, unseen by both the developer and the user. At this stage the CIL is able to be decompiled back into a state somewhat resembling what was originally written. Later on I will talk more on the tools available to do so.
  • The second half of the process happens at runtime. The Common Language Runtime (CLR) is responsible for this, taking care of tasks such as automatic memory management and employing security mechanism such as Code Access Security (CAS). It creates the environment that allows the JIT compiler to take the CIL produced and transform that into machine code targeted at the current running architecture. Essentially the compiled binaries that the .NET platform creates has the capability to run on different physical architectures and operating systems. Examples of these architectures are (x86, x86_64, ARM, ARM64).

Decompilation

There are various programs out there that let you decompile .NET assemblies which are both commercial and non-commercial. We will be using one that I’ve found which provides the best output and has powerful capabilities such as debugging.

dnSpy

dnSpy is a .NET debugger and assembly editor which lets you modify and decompile assemblies. You can find the latest version via the official GitHub repo.

Unlike other CLI decompilers dnSpy provides us with a nice user interface that mirrors that of Visual Studio.

Lets start with a simple .NET Console Application as example.

The above application will ask you to enter two passphrases. If the expected inputs are correct it will execute the function ProcessRequest() The passphrases for this example are dotnetdecompile and cihansol.com and are checked using a simple CRC32 hash calculation.

For demonstration I’ve compiled the app targeting .NET Core 3.1. The output directory contains various files, the one we are interested in is Sample Application.dll You may be wondering what the exe file is for. This gets generated because the platform targeted in this demo is Windows. This file is just a shim executable that serves the purpose to load our compiled CIL code inside of the DLL binary.

Decompiling

To decompile the compiled application with dnSpy it is as simple as dragging and dropping the file into the Graphical User Interface (GUI). Once loaded you can now begin to explore, analyze and debug the Portable Executable (PE) file that contains our application code. You can see that it automatically generates the correct C# source code with the same variable names and function names intact. There is a dropdown option (IL) which shows you the actual CIL code along with an option to output as Visual Basic if desired. There is other functionality provided as well which includes being able to explore/extract resources. For example, if you have an old legacy application which contains an embedded database resource file that you require because you have lost the source code or repository you can extract and recover that with dnSpy.

It’s also worth pointing out that there is a difference in the source code from an optimization point of view. Comparing the two might be useful if you are looking to see what the compiler has done with the code you have written and may in some cases help you write more efficient code.

Our written source code
dnSpy’s generated source code

Modifying

Firstly the input is captured for passphrase A and B. This is then passed through the check function CheckInputPP(). This function will then calculate the CRC32 hash for the input string comparing it to one of the hardcoded hashes keyAHash,keyBHash.  If the newly calculated passphrase hashes match the stored ones ProcessRequest() will be called to indicate we have passed this check. This is a very basic authentication example but I am sure you could think of more advance scenarios.

Above is a graph view of the application’s control flow along with the IL instructions generated by the compiler.

Now if we are in a situation where we don’t know the Passphrases the sample application is asking for so we can go in and modify the behavior to circumvent this check. This can be done by editing the method CheckInputPP() by right clicking and selecting Edit Method (C#).

We then can just return true from that function by editing the source code. This way there will be no hash check preformed and the result will always be true.

Once done you can hit Compile and save the edited assembly by going to File -> Save Module

A popup window will show with various modification options. What we want to do is make sure the Preserve Heap Offsets checkboxes are ticked and go ahead and press OK.

Now when we go to run the application you can see that no matter our input we get the desired outcome effectively bypassing that check.

This was a very basic text book example of modification. There can be more steps involved when dealing with larger code bases and sophisticated libraries but the general procedure is the same.

Protection

So far I’ve shown you how to decompile and modify a built .NET Core application. You might now be wondering, what is stopping someone from decompiling my application potentially comprising it’s security or stealing my source code? Firstly, it comes down to following best practice approaches like not storing connection strings, passwords, secret keys for sensitive resources in your application. That being said there are also other solutions such as obfuscating your code so it is harder for someone nefarious to dissect and decipher what is going on.

To briefly demonstrate this I will be using an obfuscator on our sample application called ConfuserEx. It has various protection mechanisms that you can enable once you load your .NET assembly, these including anti-debug and variable name scrambling.

Here is a screenshot of the same sample application we loaded previously into dnSpy however, this time it has been processed through ConfuserEx. You can observe that all the variables and functions have been obfuscated and jumbled making it very hard to figure out what is going on.

Code obfuscation is a fairly extensive topic. I will dive deeper into this subject in future blog posts explaining the implications in regards to performance, along with when not to use it challenging yourself into thinking. Is this the right approach?

Conclusion

Hopefully by now you have a better understanding of how the .NET platform works using the CLR to run your code cross platform and the disadvantages that brings in terms of code security. I’ve shown you how easy it can be to decompile and modify a built .NET application along with some solutions for code obscurity. The process I have discussed in this write up is significant to developers who want a better understanding of what is involved with creating applications on the .NET platform. Hence, this highlights the importance of keeping sensitive information out of client applications or utilize tools such as Azure KeyVault to protect keys & secrets.

For my next blog post I will walk through unpacking Xamarin mobile apps for code review and the process involved in extracting the compiled .NET assemblies.

Resources & Further Reading

Uncovering HP’s Potentially Unwanted Applications

Reading Time: 6 minutes

Background

I’m sure everyone reading this blog post has had experience with Potentially Unwanted Applications (PUA) or Potentially Unwanted Programs (PUP). You might have recently purchased a new laptop or PC and found that there are applications on it preinstalled that are annoying and unwanted. It really is a subjective topic, as one person might find these programs useful but another might find them irritating and classify them as bloatware. I’ve recently got a new HP laptop that came with various pre-installed OEM software. Some of them are useful like the recovery tools that allow OS reinstalls however I’m not a fan of the analytics and telemetry data that gets sent back without the users consent or in some cases is an opt-out feature. Most of them either don’t provide much value to the end user or just get in the way and are bothersome.

Introduction

The software or applications that are the most troubling are the ones that can not be removed. In this blog post I’m going to talk about one in particular that I noticed deployed by HP called Dynamic Audio. I will be walking through an in depth analysis using various programs and tools that I’ve picked up on over the years investigating how applications on windows function.

HP Dynamic Audio

HP Dynamic Audio is supposedly a new AI-based audio experience that tunes output to speech while suppressing background noise. The first thing I noticed is that it pre-installs itself into your Google Chrome browser and it is visible from the sidebar menu. You can see it says “Managed by your organization”

Google Chrome Managed
Google Chrome browser is managed by your organization

Clicking that button brings you to the management window inside of Google Chrome. Here you can see that HP has taken advantage of this functionality to force install the extension called HP Dynamic Audio. Now there is no way available to the end user to remove this extension from the UI and there are a few steps involved I will explain later including a script I wrote to do it. You can also take note of the permissions granted which allows this extension to read data on a number of websites.

dynamic audio chrome

Looking further into the extension we can see the websites it has access to and once again since the browser is in a managed state there is no option to turn this off or remove it from inside Chrome. This to me is unacceptable no matter what the software is. As an end user that owns a device you should have the right to remove or disable software like this especially if it has access to your data.

chrome extension hp dynamic audio

Removal Attempt

My first attempt to remove this from Google Chrome was to reinstall the browser. Since Chrome has the ability to synchronize settings this wasn’t a big issue for me. However, after a reboot it was back! So I decided to do a bit of googling and found many others in despair.

hp community post 1

hp community post 2

A simple reinstall and reboot wasn’t going to cut it. I needed to dive deeper into how and what was causing this extension to be force installed.

A deep dive

Google’s own documentation explains how to use the group policy system to enable the auto install of extensions for the use by organisations. This feature is used to enforce policies on there devices. There wasn’t adequate information in the documentation until I found a help centre article on how to stop the Chrome browser from being managed.

It was evident that whatever application/service/driver HP had installed, was writing to the registry key:

HKEY_LOCAL_MACHINE\SOFTWARE\Policies\Google\Chrome\ExtensionInstallForcelist

We can see that there is an entry in that key 317 with a value of jjnlfodbdchgijlheopgehgnmekbndmf Looking at extension Id inside of Chrome we can see it matches and this is in fact the entry for ‘HP Dynamic Audio’.

registry key hp

Removing this registry entry wouldn’t fix the problem as it will get repopulated upon reboot. So there must been an application running that is writing to this address. In order to uncover this I used a program called Process Monitor by Mark Russinovich. I’ve used this tool in the past to analyse the behaviour of certain malware to see their affects on the OS. It allows you to monitor API calls and events that occur on Windows and for this case it was perfect.

Searching for that specific registry key path it uncovered a process called SECOMN64 which was accessing and creating key entries. Bingo we got something now!

Process Monitor

One of the benefits and great functionality of this tool is it allows you to see the stack at the time of the API call.

stack trace

Here we can see the SECOMN64 executable calling into the KernelBase library querying the RegCreateKeyExW WINAPI. We can follow the stack lower into the Windows Kernel but there is no need.

Now that we have the file path to SECOMN64.exe we can throw it into a dissembler and reverse engineer what is going on.

Interactive Dissembler (IDA)

The Interactive Disassembler (IDA) is a reverse engineering tool that can be used to dissect executables. It has a powerful dissembler that can take machine processer instructions and generate pseudo readable source code for you to understand and reverse engineer application functionality.

Looking at the strings inside the executable you can see there is the same extension id that we found in the registry key. There are also other strings there which indicate that there is some functionality to classify websites the user is currently on and also one called YoutubeCategoryClassifications which is interesting.

There is also some amusing debug error entries about force install failing.

Cross-referencing the string for the extension Id we can find the function responsible for its creation. Alternatively using the stack trace we can find the location of the exact call by offsetting from the loaded image base. To find or change that is via the Edit -> Segments -> Rebase program.


The PE Image executable inside of IDA was loaded at 0x140000000 therefore we simple add the offset shown in the stack trace window.

0x140000000 + 0x5480 = 0x140005480

This will bring us to exactly where we need you can see those WinApi calls we caught with Process Monitor. RegCreateKeyEx RegSetValueExW

Hitting F5 in IDA allows us to view the x86-64 assembly in a human readable pseudo code.

We now know what process is causing the install of this extension and what it’s doing to do that utilizing the ExtensionInstallForcelist ability inside of Google Chrome.

Windows Services

Looking at the Windows Services we can find a match for that executable and it seems to be named Sound Research SECOMN Service.

At the time of writing this blog post, setting the service Startup type to Disabled and deleting the relevant registry keys in the registry seems to remove this browser extension from being force installed into Chrome. I may write a subsequent post at some point in the future if I uncover other interesting information. Something that stood out to me whilst looking at another service in the same driver bundle was that there is some activity to suggest other web browsers might be impacted in a similar way.

ida code

Conclusion

It is disappointing how manufactures go about installing PUAs onto user machines and there should always be a choice to the end user to remove or disable what they do not want on their computers. I hope this deep dive gave some insight into how you may investigate activity of applications using tools such a Process Monitor and IDA.

I have created a windows batch script that automates the process of removing the Managed state of Chrome and disabling the service responsible for persisting the extension install below.


References & Resources